
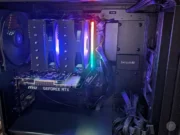
I didn’t set out to build the most powerful machine I could afford.
My computing needs generally involve running a couple of websites, video calls, everyday productivity work, answering posts on a forum and often having a sh**load of Chrome tabs open.
What I wanted was a machine that could do that without a lot of huffing and puffing and noise. I wanted a machine that was quiet, whisper quiet.
That goal shaped nearly every decision, including buying more powerful components than I would normally need.
What Went Into It, and Why
Here’s what went into the build and why I made the choices I did.
I started with an AMD Ryzen 7 7700X processor, which is the clearest example of the “overpowered on purpose” approach I mentioned above.
Even though it’s not a cutting edge recent release, the AMD Ryzen 7 7700X is more than what I need for browsing, video calls, and everyday work. It barely breaks a sweat doing normal tasks, which means it runs cooler, which means the fans don’t have to spin up to compensate. Buying “too much” processor was really a way of buying quiet.
Alongside it, I picked a compact MSI micro-ATX motherboard. It keeps the overall case smaller without giving up any of the connectivity I needed, and built-in WiFi meant one less thing to add or troubleshoot later.
Memory turned into the build’s biggest surprise. I wanted enough that I’d never think about it again, so I went with 32GB of Corsair DDR5 RAM. What I didn’t expect was the price tag attached to it. Memory prices have climbed noticeably this year, and this single component ended up being one of the most expensive line items in the entire build, more than I expected to pay for something that used to be one of the cheaper parts of a PC. And yeh… I splurged a little and got the LED version of this and the next item, the CPU fan 🙂
For cooling, I went with a large Thermalright air cooler instead of a liquid all-in-one unit. Air coolers have no pump to hum, no liquid to eventually leak, and this one is sized generously enough to keep the Ryzen 7 running cool and quiet without working hard.
I paired it with a be quiet! power supply quite a bit more powerful what the system actually needs, for the same reason as the CPU – a power supply running well under its maximum capacity runs cooler and quieter than one working near its limit. The be quiet! brand also has a reputation specifically for low-noise components, which mattered more to me here than raw specs.
That same logic carried through to the case, a be quiet! Pure Base 501, which I’ll come back to below. It turned out to work a little differently than I expected.
For storage, rather than buying a new drive, I pulled a 1TB NVMe drive out of an old laptop that was otherwise retired. It saved a meaningful chunk of the budget and gave that drive a second life as my new boot drive.
The one part I added that this build didn’t strictly need was a discrete graphics card.
Technically I could have skipped it entirely, but I chose an older, budget-tier MSI RTX 3050 Ventus 2X 6G OC Graphics Card specifically because it was inexpensive while still unlocking the one feature I actually wanted: support for NVIDIA Broadcast, software that uses the GPU to do things like simulate eye contact on video calls, even when I’m actually looking at my screen instead of the camera. For a relatively small outlay, that felt worth it.
All told, the build came to roughly $1,230. Not a budget build, but far less than most pre-built machines with comparable capability, and built specifically to run quiet, and it’s working great!
The case: Quiet Through Airflow, Not Isolation
Of everything above, the case was the most counterintuitive part of the build for me.
I assumed “quiet” meant “sealed up.” That the case would be closed off to keep sound in and dust out.
It’s actually the opposite. The case has openings for airflow on the top, on the bottom, on the front, and on the back. When I pulled this out of the box I thought, there’s no way this is going to be quiet with that many vents!
The I found that the quiet comes from good airflow paired with sound-dampening material, not from trapping everything inside. Air moves through efficiently, components stay cooler, the be quiet! fans are quite, and cooler components mean the fans don’t have to work as hard, which means less noise.
That understanding came a little too late for one decision, though. I skipped the windowed side panel option, assuming a solid panel would help with the sound dampening.
Once I understood how the airflow-and-dampening approach actually works, I realized the window wouldn’t have hurt the acoustics at all. Now I wish I’d gotten it. The LED lights still show through the top vent/screen and that’s pretty cool looking. But now I’m looking for a be quiet! Pure Base 501 windowed panel and I don’t see any online. Darn.
AI Helped Me With This Build, A LOT!
From picking compatible parts to troubleshooting issues that came up along the way, Claud.ai came in handy… but it wasn’t perfect. You can read the full story about that experience in my earlier article.


